Make your development environment flexible
Many bigger development projects require a more or less complex development environment. In this case I do not talk about the IDE, compiler etc., but all components that are required to run the project that is under development. Let’s take a big web application that requires Apache, Tomcat and MySQL. All of these applications are customized in one way or the other. Each time a new developer needs to be ramped up for the project, just setting up the PC might take a day or even more.
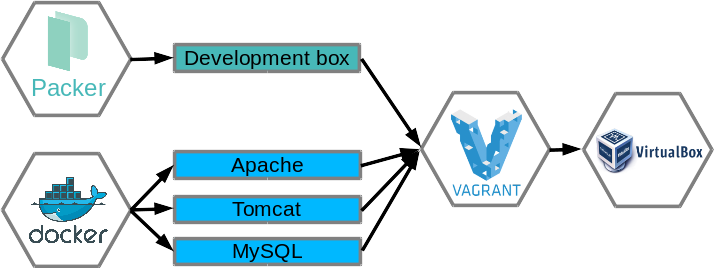
To simplify this and keep away the complexity of the setup from developers, I started to experiment with VirtualBox virtual machines (VM). After a while I started to use more tools to make the setup and configuration of a development VM as flexible as possible. The current result is a setup that uses Packer, Docker, Vagrant and VirtualBox. All a new developer has to do when he/she starts to work on the project is to check out a Vagrant file, make a few configurations and run ‘vagrant up’. This only takes a few minutes and after that a full setup for the development is in place.
Below, I will explain the tool chain a bit.
Tool chain
Packer
Packer is a very powerful tool to create VM images. It supports VirtualBox, VMWare, Amazon Cloud etc. It takes an ISO installation image and some parameter to customize the installation process. You just need to build the Packer project and the VM is created automatically. So instead of downloading VirtualBox VMs and doing some customization, you create the VM directly. This makes the it reproducible at any time.
Docker
Docker is very well know nowadays. It currently is the most popular solution to run Containers on the Linux Kernel. A Container is not a VM, but is separated from the host system by using its own name and process space etc. The idea behind this Container solution is to run one application per Container, isolated from the host system, but with all dependencies included. Doing so, the application is more flexible and scalable.
Vagrant
Vagrant can be used to start customized VMs. You can specify the networking aspects, synchronized folders, the memory and many more things. Besides that you can run several types of provisioners like Puppet, Docker etc. in the new VM to complete the setup. Vagrant can be used together with VirtualBox, VMware and other virtualization technologies. Compared to Packer, which cares for the general VM setup, Vagrant is used for the run-time setup to adapt the VM to the specific requirements of the user.
VirtualBox
VirtualBox is very well known. It is one virtualization solution for several platforms and very easy to use. However, the target is more a PC than a server.
Some details
Here, I want to show some more details about the tools. The configuration files shown here are just examples to give you an idea how the tools work. They are incomplete to save space, so you can probably not use them as is for any project.
Packer
Packer, in this context, is used to create a Vagrant Box for VirtualBox as a basis for Vagrant. I chose the Boot2Docker ISO image as a starting point. It is very small and provides all tools we need to run the Docker containers. I did not use Boot2Docker aka Docker Machine, because it does not provide the flexibility in configuration that we need. However, the Boot2Docker distribution image is very useful.
A Packer configuration JSON file might look like this:
1
2
3
4
5
6
7
8
9
10
11
12
13
14
15
16
17
18
19
20
21
22
23
24
25
26
27
28
29
30
31
32
33
34
35
36
37
38
39
{
  "variables": {
    "url": "https://github.com/boot2docker/boot2docker/releases/download/v1.9.1/boot2docker.iso",
    "checksum": "d1ac84f01f9e3bc9eaf68a38afdbe2accd11b1d6c678d107018b545552cba199"
  },

  "builders": [{
    "type": "virtualbox-iso",
    "iso_url": "{{user `url`}}",
    "iso_checksum_type": "sha256",
    "iso_checksum": "{{user `checksum`}}",
    "guest_additions_mode": "disable",
    "guest_os_type": "Linux_64",
    "ssh_username": "docker",
    "ssh_password": "tcuser",
    "shutdown_command": "sudo poweroff",
    "vm_name": "development_vm_packer_build",
    "disk_size": 15000,
    "vboxmanage_post": [
      [ "modifyvm", "{{.Name}}", "--memory", "2048"]
    ]
  }],

  "provisioners": [{
    "type": "shell",
    "inline": [
      "echo 'Configure Docker ...'",
      "sudo echo 'DOCKER_TLS=no' >> /tmp/profile",
      "sudo cp /tmp/profile /var/lib/boot2docker"
    ]
  }],

  "post-processors": [{
    "type": "vagrant",
    "include": ["boot2docker.iso"],
    "vagrantfile_template": "vagrantfile.tpl",
    "output": "development-vm-{{.Provider}}.box"
  }]
}
First, I define some variables, in this case I provide the URL and check sum of the Boot2Docker ISO image. In line 7 I define a ‘builder’. This ‘builder’ specifies the basic installation details like the type ‘VirtualBox VM installed from an ISO image’. In line 24 we have a provisioner. In this case I use the shell to configure Docker, but we could also use tools like Puppet here. In line 33 I define a post processor that creates the Vagrant Box from the VM that we have created in the steps before. Is is also possible to upload the Box to Hashicorp’s Atlas directly.
Docker
In this setup I use one Docker container for the (already deployed) data base, one for the Tomcat application server, and a third one for the Apache HTTP server. All these applications are ready to use for the development work. The Tomcat application server is more or less empty. Applications can be deployed to it automatically by the build system, for example.
A Dockerfile could look like this:
1
2
3
4
5
6
7
8
9
10
11
12
13
14
15
16
17
18
19
20
21
22
FROM openjdk:jdk-alpine

ENV TOMCAT_VERSION_MAJOR=8
ENV TOMCAT_VERSION_MINOR=5
ENV TOMCAT_VERSION_PATCH=5
ENV TOMCAT_VERSION=${TOMCAT_VERSION_MAJOR}.${TOMCAT_VERSION_MINOR}.${TOMCAT_VERSION_PATCH}

COPY files/tomcat_startup.sh /

RUN curl -sS http://ftp.halifax.rwth-aachen.de/apache/tomcat/tomcat-${TOMCAT_VERSION_MAJOR}/v${TOMCAT_VERSION}/bin/apache-tomcat-${TOMCAT_VERSION}.tar.gz | tar zxf - -C /opt \
&& ln -s /opt/apache-tomcat-${TOMCAT_VERSION} /opt/tomcat \
&& curl -sS -o /opt/tomcat/lib/catalina-jmx-remote.jar http://ftp.halifax.rwth-aachen.de/apache/tomcat/tomcat-${TOMCAT_VERSION_MAJOR}/v${TOMCAT_VERSION}/bin/extras/catalina-jmx-remote.jar \
&& addgroup -S tomcat \
&& adduser -s /sbin/nologin -h /opt/tomcat/work -G tomcat -D -H tomcat

USER tomcat

VOLUME ["/opt/tomcat/logs"]

EXPOSE 8001 8009 8080

CMD ["/bin/sh", "-l", "-c", "/tomcat_startup.sh"]
In line one, I define the Docker image I want to build the image on. In this case I chose a minimal Linux system with OpenJDK inside as a basis. In line 3 to 6 we have some environment variables. These variables are available not just in the Dockerfile, but will be injected into the running container as well. In line 8 I copy a file from the local file system into the image. In line 10 the Tomcat application is installed and the Tomcat user is added to the system. It makes sense to combine many commands in one RUN statement, because each RUN statement creates a new Layer in the Docker image. Saving layer saves space and complexity. In line 16 I tell Docker that we want to work as tomcat user from now on. This also applies to the running container later on. Volumes, like in line 18, are used for persistent data that should survive a container after it has been deleted. It is also possible to mount a local directory to that volume directory. In line 20 I announce the ports that the application provides. Finally, in line 22 I specify the command that should be run when the container is started. I chose the script here that has been copied before.
It is important to know that an application in a Docker container should run in foreground all the time. Once the application stops, the Docker container stops as well.
Vagrant
Now, I integrate all the components we have created before. I take the Vagrant Box that has been created by Packer, adapt the synchronized folders, configure the networking and start the Docker packaged applications.
1
2
3
4
5
6
7
8
9
10
11
12
13
14
15
16
17
18
19
20
21
22
23
24
25
26
27
28
29
30
31
32
33
34
VAGRANTFILE_API_VERSION = "2"

Vagrant.require_version ">= 1.6.3"

Vagrant.configure(VAGRANTFILE_API_VERSION) do |config|
  config.vm.define "Development VM"
  config.vm.box = "development-vm-virtualbox"
  config.vm.box_url = "https://example.local/development-vm-virtualbox.box"
  config.vm.synced_folder "../logs", "/logging", :mount_options => ["dmode=777,fmode=777"]

  config.vm.provider "virtualbox" do |vb|
    vb.name = "development-vm"
  end

  config.vm.network "private_network", ip: "192.168.100.10"
  config.vm.network "forwarded_port", guest: 8080, host: 8080, id: "Tomcat"

  config.vm.provision "file", source: "config.json", destination: "/root/.docker/config.json"

  # Create custom Docker network
  config.vm.provision "shell" do |s|
    s.inline = <<-EOT
      echo "Create custom network 'dev' ..."
      docker network create --driver bridge dev
    EOT
  end

  config.vm.provision "docker" do |d|
    d.run "tomcat",
      image: "example.local/tomcat-development",
      args: "-p 8000:8000 -p 8001:8001 -p 8009:8009 -p 8080:8080 -v /logging:/opt/tomcat/logs --net=dev",
      restart: "no"
  end
end
In line 8 I specify the Vagrant Box that has been created by Packer. In line 9 I create a synchronized folder for the logs so that this folder can be mounted into the Tomcat Docker container. In line 15 I define an additional network that is very useful to access applications in the VM later on. In line 16 I enable port forwarding for some ports for a better integration with the build system. However, I suggest not to use too much port forwarding, as it could lead to conflicts with local services. The fixed IP of the additional network is much better to access the applications. Line 18 starts a file provisioner to copy a file, line 21 a shell provisioner to create a custom Docker network. All containers that we start will be added to this network. By doing this, Docker takes care that the containers can access each other. This is the preferred way to connect Docker containers today. Container links are more or less deprecated and are much less flexible. And finally we start a Docker container in line 28 by using the ‘docker’ provisioner.
Conclusion
Of course the application stack adds some layers and thus some complexity to the system. On the other hand the setup is done much quicker and many unrelevant details of the application are hidden. Depending on the performance of the host, it is possible to run several application instances in parallel.
Putting the application into Docker containers makes it more flexible. Another nice side effect is, that the applications are isolated from the host system. So the host system has much less influence on the running applications. Things are more reproducible.